
Imagine a snack that costs less than a coffee, takes less time than scrolling a reel, and actually keeps you full. That’s these No-Bake Oatmeal Bars. They’re sticky, chewy, chocolatey (if you want), and unapologetically efficient.
No oven, no fuss, no long ingredient list you’ll never use again. Make a pan today, and tomorrow you’ll wonder why you ever bought granola bars in a crinkly wrapper.
What Makes This Recipe Awesome
- Zero baking required: Your oven can nap. This is all stovetop (or even microwave) and chill time.
- 5–10 minutes of hands-on work: The longest part is waiting for the bars to set.
Patience not included.
- Kitchen-sink friendly: Swap nut butters, sweeteners, and add-ins with what you’ve got. It’s flexible by design.
- Actually satisfying: Oats + healthy fats = steady energy, not a sugar crash disguised as a snack.
- Freezer-friendly: Make a big batch once, coast for weeks. Future-you will send a thank-you note.
Ingredients
- 2 1/2 cups old-fashioned rolled oats (not instant; quick oats work in a pinch but change texture)
- 1 cup natural peanut butter (or almond, cashew, or sunflower seed butter)
- 1/2 cup honey or pure maple syrup
- 1/4 cup coconut oil or unsalted butter
- 1 teaspoon vanilla extract
- 1/2 teaspoon fine sea salt (reduce if using salted nut butter)
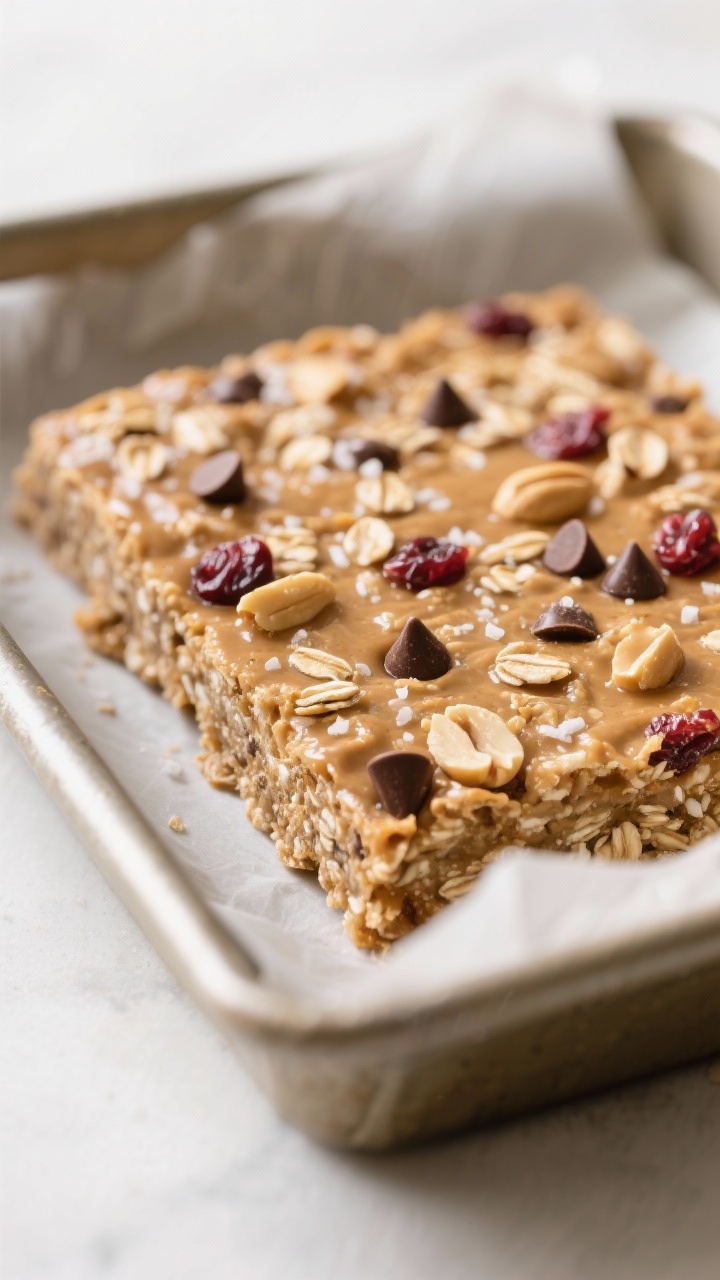
- 1/2 cup mix-ins (choose: mini chocolate chips, chopped nuts, shredded coconut, dried cranberries, or seeds)
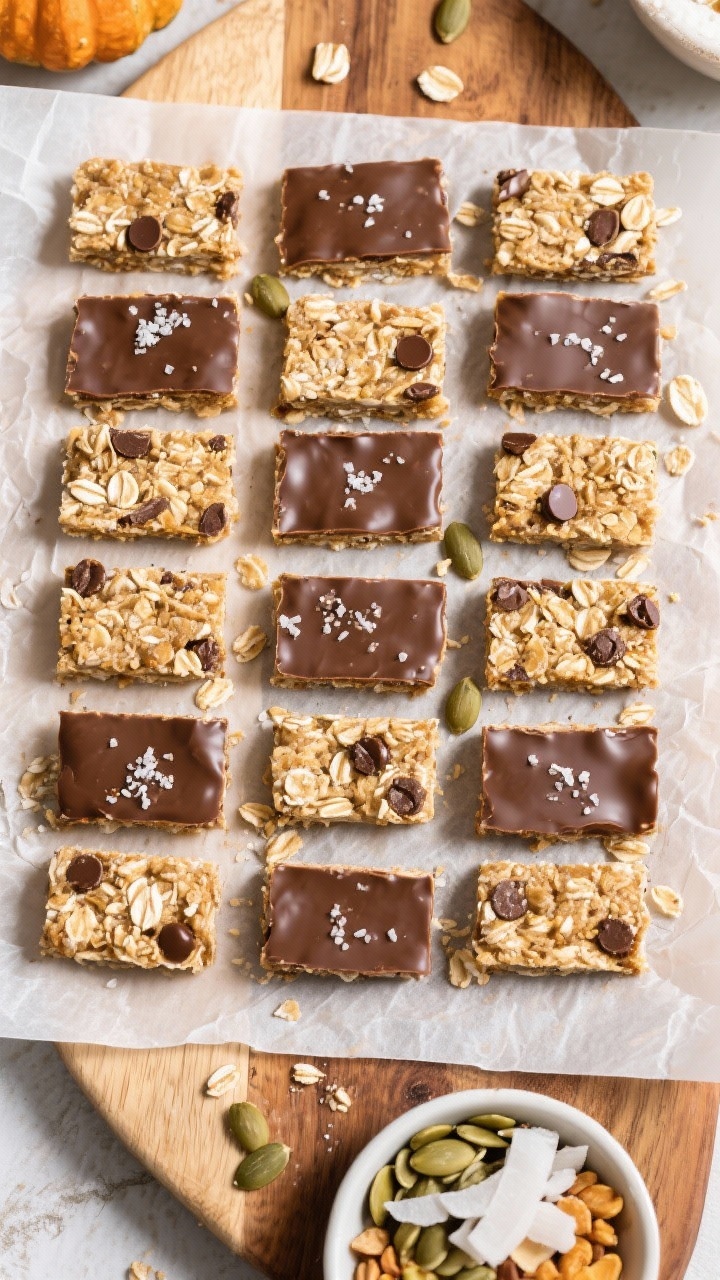
- Optional chocolate topping: 1 cup dark chocolate chips + 1 tablespoon coconut oil
Let’s Get Cooking – Instructions

- Prep your pan: Line an 8×8-inch baking pan with parchment, leaving overhang for easy lifting.
Lightly grease the parchment if your bars tend to stick.
- Warm the base: In a medium saucepan over low heat, combine peanut butter, honey, and coconut oil. Stir until smooth and glossy, 2–3 minutes. Do not boil; we’re melting, not making candy.
- Add flavor: Remove from heat.
Stir in vanilla and salt. Taste and adjust salt for balance—sweet needs a wingman.
- Fold in oats: Add oats and mix-ins. Stir like you mean it until every oat is coated.
If using chocolate chips and you want them intact, let the mixture cool 3–4 minutes first.
- Press and level: Transfer to the pan. Press firmly with a spatula or the bottom of a measuring cup to compact. The tighter you press, the cleaner the slab.
- Optional chocolate topping: Melt chocolate chips with coconut oil in the microwave (30-second bursts, stirring) or over a double boiler.
Pour over the pressed oats and smooth.
- Chill to set: Refrigerate for 1–2 hours or freeze for 25–30 minutes until firm.
- Slice and serve: Lift with parchment, place on a board, and cut into 12 bars or 16 squares. Store cold for the cleanest bites.
How to Store
- Fridge: Keep in an airtight container for up to 10 days. Separate layers with parchment to avoid sticking.
- Freezer: Wrap bars individually and freeze for up to 3 months.
Thaw at room temp for 10–15 minutes, or eat straight from the freezer if you like a firmer chew.
- On-the-go: For lunchboxes, pack with an ice pack or they’ll soften. Still tasty, just a little “rustic.”
Health Benefits
- Steady energy: Rolled oats provide complex carbs and soluble fiber (beta-glucan) that help slow digestion and keep you full.
- Healthy fats and protein: Nut or seed butter delivers monounsaturated fats and plant protein—great for satiation and blood sugar stability.
- Better sweetener choices: Honey or maple syrup bring trace minerals and a lower processing footprint compared to refined sugars. Still sugar, but a smarter play.
- Customizable nutrients: Add chia or flax for omega-3s, pumpkin seeds for zinc and magnesium, or dried fruit for iron and antioxidants.
- Gluten-friendly: Use certified gluten-free oats if needed.
Easy win for mixed-diet households.
What Not to Do
- Don’t skip the press: Lightly spreading the mixture leads to crumbly chaos. Pack it down firmly.
- Don’t overheat the base: Boiling the honey or syrup makes the bars gritty and hard. Low and slow is the move.
- Don’t use instant oats: They’ll turn mushy and weird.
Rolled oats give the ideal chewy bite.
- Don’t add wet mix-ins: Fresh fruit will waterlog the bars. Stick to dried fruit or chocolate.
- Don’t slice warm: If you’re impatient, you’ll get oat rubble. Chill first, victory later.
Variations You Can Try
- Almond Joy Vibes: Almond butter base + shredded coconut + toasted sliced almonds + dark chocolate topping.
- Trail Mix Bars: Peanut butter + chopped peanuts + raisins + sunflower seeds + a handful of mini M&M’s (because balance).
- PB&J: Swirl 2–3 tablespoons of strawberry or raspberry jam into the mixture before pressing.
Use peanut butter base.
- Mocha Crunch: Add 1 tablespoon instant espresso powder to the warm base + cacao nibs for crunch.
- Tahini-Date: Tahini + chopped Medjool dates + sesame seeds + a pinch of cinnamon and cardamom. Sophisticated, but not snobby.
- High-Protein Boost: Stir in 1/3 cup vanilla or chocolate protein powder; add 1–2 tablespoons extra coconut oil or a splash of milk if the mixture gets too dry.
- Nut-Free School Safe: Sunflower seed butter + pumpkin seeds + dried blueberries. Still A+ on flavor.
FAQ
Can I make these vegan?
Yes.
Use maple syrup instead of honey and ensure your chocolate is dairy-free. Swap butter for coconut oil. Easy win.
Do these hold up at room temperature?
They’ll hold for a few hours, but they soften.
For events, keep chilled until serving. If your room is warm, expect a softer bite—not a failure, just a vibe.
What if I only have quick oats?
They’ll work, but the texture will be less chewy and more dense. Reduce the oats slightly (to about 2 1/4 cups) if the mixture feels too dry.
How sweet are these?
Moderately sweet.
If you prefer less sugar, drop the honey/maple to 1/3 cup and bump the nut butter by 2 tablespoons. Add a pinch more salt for balance.
Can I add protein powder without ruining texture?
Yep. Add 1/3 cup and compensate with 1–2 tablespoons more coconut oil or a splash of milk to keep it cohesive.
Press firmly and chill well.
Why did my bars fall apart?
Likely under-pressed, under-chilled, or too many dry add-ins without enough binder. Warm the mixture slightly, press again, and chill longer. Next time, tighten the ratios.
Is there a microwave version?
Absolutely.
Microwave the nut butter, sweetener, and coconut oil in 30-second bursts until smooth, then proceed. Keep the power moderate to avoid scorching.
Can I halve or double the recipe?
Yes. Halve for a loaf pan; double for a 9×13-inch pan.
Adjust chill time (a thicker slab needs longer).
Are these good for kids?
Totally. Just choose nut-free options if needed and keep pieces small for younger kids. They’re lunchbox heroes, IMO.
My Take
No-Bake Oatmeal Bars are the cheat code for the “busy but want better snacks” crowd.
They’re customizable, budget-friendly, and actually satisfying—like the grown-up version of a granola bar that doesn’t crumble into dust at first bite. Keep a slab in the fridge and you’ll upgrade breakfast, pre-workout, or the 3 p.m. slump without thinking. Low effort, high payoff—exactly how home cooking should feel.